PAYware SIMM Interface
Installation Guide
For PAYware PC, PCCharge, and PAYware Connect (formerly IPCharge)
Last Revised 2/27/15
IMPORTANT: On March 1st 2015, ASI implemented it new Gateway policy. Restaurant Manager installations after that date must use one of the approved gateway platforms to process credit cards. This document sole purpose is for installation prior to the March 1, 2015 date.
Introduction
Restaurant Manager also offers integrated processing of third party online gift cards via a legacy Verifone product:
Restaurant Manager also offers integrated processing of third party online gift cards via a legacy Verifone product:
IMPORTANT: ASI recommends AGAINST using PCCharge for credit card processing except in the case that the user also wishes to process third party online gift cards. Because gift card processing is not yet supported for PAYware PC or PAYware Connect, PCCharge or Mercury Payments are the only option for processing online gift cards.
Setup for the PAYware SIMM interface is a three step process.
- Installation of the VeriFone Software
- Configuration of PAYware SIMM options in RMCCWIN.
- Station Configuration in RM BackOffice Module
Before proceeding with setup, it is critically important that read these PCI Compliance Guidelines. It is also recommended that you review this PCI Compliance Checklist with your client and then ask them to sign this waiver stating that their business, not yours, is solely responsible for meeting the Data Security Standards (DSS) of the Payment Card Industry (PCI).
Note: Credit card pre-authorization is supported with Mercury (MPS) only. Attempting to do Credit card pre-authorization with other CC processors using PAYware PC, IPCharge, or PCCharge may create undesirable results.
Overview
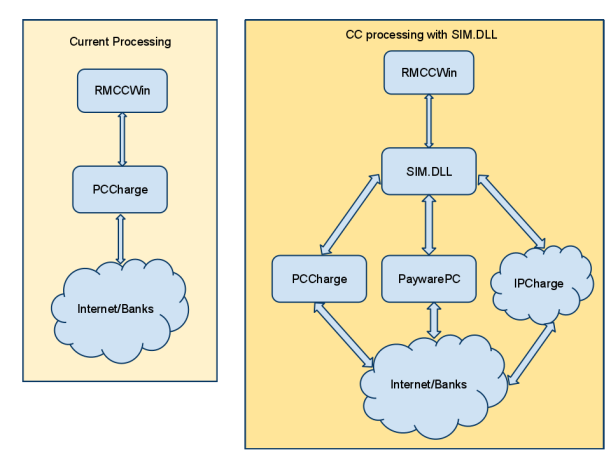
In the past, RMCCWIN would communicate directly with the credit card software. Now, payment information is communicated via the new SIM (Secure Integration Method) interface. While PAYware SIM drives the credit card software, collecting both sensitive and non-sensitive transaction data, it passes only the payment command to the RMCCWIN. So the system is shielded from transmitting or storing any sensitive data. You can read about more PAYware Suite options on the VeriFone website.
The illustration below outlines the differences between directly communicating with CC processing engine compared to using SIM.DLL
Requirements
The following are the requirements for both hardware and software.
Hardware Requirements
The following is a list of hardware requirements needed for PAYware SIMM:
- 1 GHz or Higher, 2GHz, preferred
- 2 GB minimum of RAM, 4 GB recommended
- 500 MB of available hard-disk space. 1 GB preferred
- Internet connection or Hayes compatible modem (capable of 2300 baud or less) and an analog phone line
Software Requirements
The following is a list of software requirements needed by both Restaurant Manager and PAYware SIMM:
- Restaurant Manager version 17 with a build 17.0.2010.9240 or later with Credit Card Interface enabled.
- RMCCWIN version 4.1
- SIMM.dll- this should be installed in the Rmwin folder when upgrading RM. However, you may still want to verify.
- PC running Windows 7 (Enterprise, Ultimate, Professional Editions), Windows XP Professional, Windows 2003 Server, Windows 2008 Server, Vista Business Edition
- Microsoft .NET 3.0 Framework- required by PAYware SIMM. PAYware SIMM will scan for .NET 3.0 Framework during the installation process and provide installation guidance.
- Microsoft .NET 2.0 Framework (not necessary for Windows 7 installs)- needed by Restaurant Manager. The .NET 2.0 Framework includes RegAsm.exe used to register the Sim.dll.
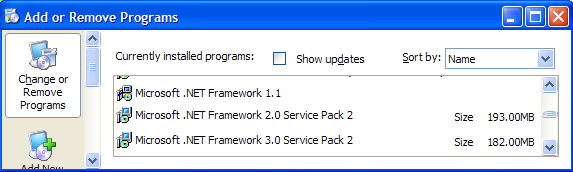
You can verify if the Microsoft Frameworks are currently installed on the computer by opening "Add or Remove Programs" in the system's Control Panel. If installed the program should appear on the list.
Note: PAYWare PC is only supported on version 17 moving forward. The PAYWare PC option will appear in RMCCWIN version 4.1 and in RM BackOffice Station Configuration settings (CC Options). In addition, the PAYWare PC options may be active. This does not mean that it will work with version 16. The options are present because of the code sharing between rmwin and the RMCCWIN interfaces.
Setup
Setup for the PAYware SIMM Interface is a three step process. First, you will need to install the VeriFone credit card software. Additional configuration will have to be done in RMCCWIN and in the RM BackOffice Module to complete the PAYware SIMM interface integration. Some other additional configuration may be needed if you are using the PAYware SIMM interface to process third party online gift cards.
VeriFone Software
- Install credit card software per VeriFone’s instructions on the RMSERVER
- Configure Credit Card with merchant and network processor information per VeriFone’s instructions
- Using the VeriFone interface, verify correct card processing settings by running a couple of transactions and settling the batch.
ASI’s Credit Card Interface (RMCCWIN)
Use the following steps to setup the PAYware SIMM options to interface into RMCCWIN. Be aware that there are separate sections for both credit card and gift card (if processing gift cards on line). In addition, each VeriFone product has it's own separate section for programming options. Make sure you are in the correct SIMM.DLL section (i.e. IPCharge via SIMM.dll vs PAYware PC via SIMM.dll) when configuring your data.
Credit Card Setup
- Run RMCCWIN on the same computer running VeriFone Software. This will typically be the RMSERVER. RMCCWIN (.exe) can be found in the rmwin working directory.
- Open the RMCCWIN by right clicking on the icon in the systray.

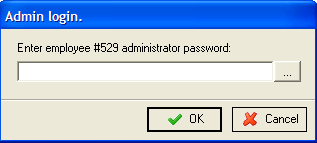
- Log into the RMCCWIN using an 4 digit alpha-numeric Administrator Password ( File > Login New User)
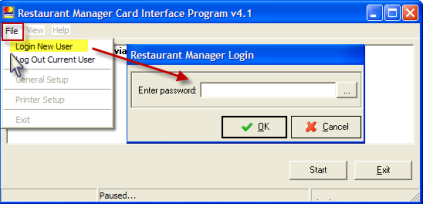
- Click on the “STOP” button in the RMCCWIN form. Bring up the Restaurant Manager Card Interface Configuration form by selecting File menu option > General Setup.

- Select the “Admin Settings” button at the bottom left corner of the Restaurant Manager Card Interface Configuration form. Enter the strong Admin password associated with the employee’s password used in step 3 (setup for the Administrator in the RM BackOffice Module).
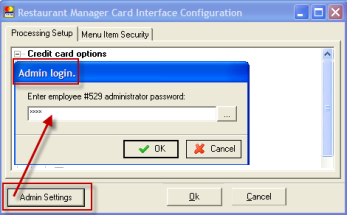
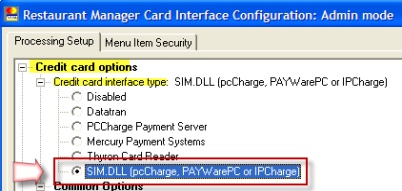
- Under the Processing Setup tab > “Credit card options” > Credit card interface> select the “Sim.dll (PCCharge, PAYWarePC, or IPCharge) option.
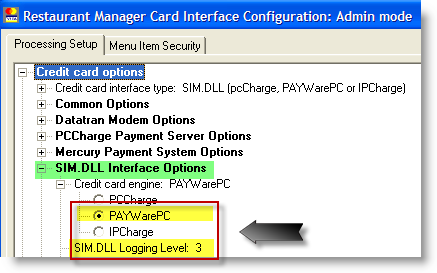
- Go to the SIM.DLL Interface Options and fill in the following fields::
- Credit Card Engine- Select the VeriFone software option you will be using (i.e PAYware PC or IPCharge)
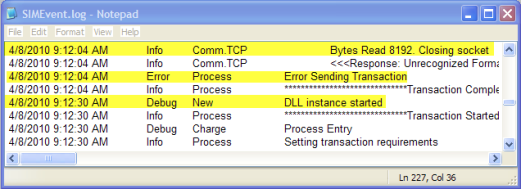
- SIMM.DLL Logging Level- The value entered in this field determines the amount of logging desired. If enabled, SIMEvent.log file is created in the rmwin directory.
The values are:
0- Off/No Logging
1- Errors Only- records errors that occur during startup, processing transactions, or improper setup
2- Information- records general transaction information when processing payments
3- Detailed Debug- records detailed information regarding the application's progress during the transaction.
PCCharge Credit Card Settings
Each VeriFone product has it's own separate section for programming options. Make sure you are in the correct SIMM.DLL section when configuring your data. Use the following steps to configure options for PCCharge. Under the SIM.DLL Interface Options go to the PCCharge Via SIMM.DLL Settings menu option and fill in the following fields:
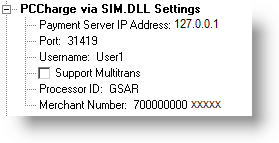
- Payment Server IP Address- This is the IP address of the computer where PCCharge is running. The default setting is 127.0.0.1 (the computers loopback IP). The setting should be changed to the IP address of the computer where RMCCWIN resides. If running RMCCWIN and PCCharge are running on different computers, change the IP address setting to the computer’s IP address where PCCharge resides.
Note: There has been reports the loopback ip causes a conflict when processing credit cards at the POS. A 205 error message in RMCCWIN appears if the loopback ip is in conflict: No connection could be made because the target machine actively refused it 127.0.0.1:XXXX (x's = port number). Try using the ip address of the computer hosting the Verifone software (i.e. 192.168.X.X) to resolve the issue.
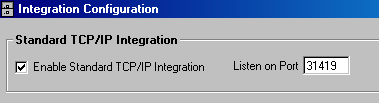
- Port- The default value is set to 31419. Make sure the RMCCWIN setting has the same port number configured in PCCharge >Setup >Configure System >Advanced >Configure IP settings.
- Username- This field setting must be the same as the username assigned in PCCharge. The username by default is "User1". You can verify this in PCCharge under Setup > Users.

- Support Multitrans- This option will support multi-transaction mode, this keeps the line or internet link open for a few seconds after processing to wait around for another transaction. This must also be enabled in the Payment Server.
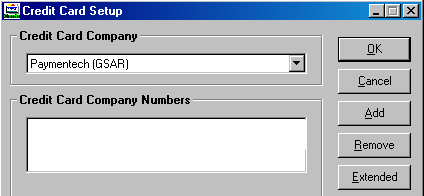
- Processor ID- Name (abbrev) must match Credit Card Company used in Payment server (i.e. Paymentech = GSAR) or this field can be left blank if "Use Default Processor" is checked in the Payment Server (Configure System > Preferences).
- Merchant #- Number must match Credit Card Company used in Payment server (i.e. Paymentech = GSAR) or this field can be left blank if "Use Default Processor" is checked in the Payment Server(Configure System > Preferences) .
PAYware PC Settings
Each VeriFone product has it's own separate section for programming options. Make sure you are in the correct SIMM.DLL section when configuring your data. Use the following steps to configure options for PAYware PC. Under the SIM.DLL Interface Options go to the PAYWarePC Via SIMM.DLL Settings menu option and fill in the following fields:
- Payment Server IP Address- This is the IP address of the computer where PAYWare PC is running. The default setting is 127.0.0.1 (the computers loopback IP). The setting should be changed to the IP address of the computer where RMCCWIN resides. If running RMCCWIN and PAYWare PC are running on different computers, change the IP address setting to the computer’s IP address where PCCharge resides.
Note: There has been reports the loopback ip causes a conflict when processing credit cards at the POS. A 205 error message in RMCCWIN appears if the loopback ip is in conflict: No connection could be made because the target machine actively refused it 127.0.0.1:XXXX (x's = port number). Try using the ip address of the computer hosting the Verifone software (i.e. 192.168.X.X) to resolve the issue.
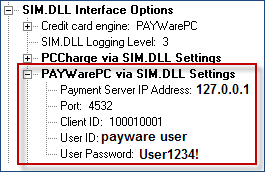
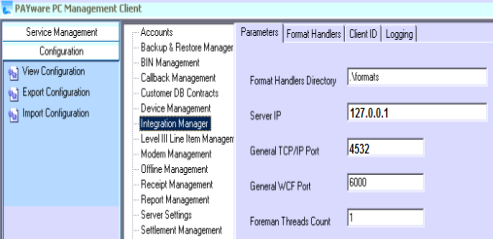
- Port- The default value is set to 4532. Make sure that Management Client has the same port number configured in Configuration->View Configuration >Integration Manager->General TCP/IP Port. The Management Client is typically installed in C:\Program Files\VeriFone\PAYware PC\Server\ManagementClient.exe.
- Client ID- The default value is set to “100010001”. This value corresponds to the account setup in the management client or the configuration wizard, the first account has a client ID of 100010001, if a second client is setup under that same account the client ID will be 100010002. The ClientID value is actually made up of three different pieces of information: An ACCOUNT number, a SITE number, and a TERMINAL number.
- User ID- This field setting must be the same as the user’s login assigned in PAYware PC. The UserID setup in PAYware PC must have proper permissions to perform credit card transactions.
- User Password- Enter the same password assigned to the UserID in PAYware PC.

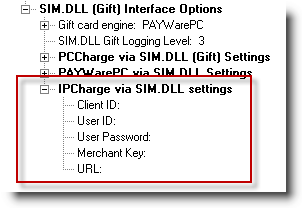
IPCharge Credit Card Settings (a.k.a.PAYware Connect)
Each VeriFone product has it's own separate section for programming options. Make sure you are in the correct SIMM.DLL section when configuring your data. Use the following steps to configure options for IPCharge. Under the SIM.DLL Interface Options go to the IPCharge Via SIMM.DLL Settings menu option and fill in the following fields:

- Client ID- The ClientID used by the integrator or merchant determines which merchant account / terminal will be used to process the transaction. This value is automatically assigned by IPCharge, PAYware PC, and PAYware Transact. The ClientID value is actually made up of three different pieces of information: An ACCOUNT number, a SITE number, and a TERMINAL number. Note: for IPCharge users: this value can be retrieved on the completion for the merchant setup by a reseller in the reseller console.
- User ID-Enter the user's login as assigned by IPCharge . The UserID must have proper permissions to perform credit card transactions.
- User Password- Enter the password assigned to the UserID in IPCharge
- Merchant Key-Enter the key provided by VeriFone. This field is used to validate the merchant by IPCharge
- URL- By default this is set to https://IPCharge.net/IPCHAPI/rh.aspx. This is the URL of the IPCharge gateway.
Gift Card Setup
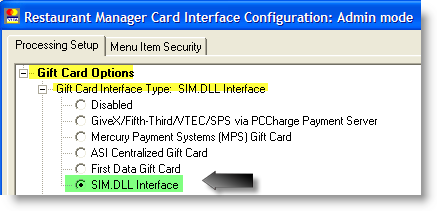
The RM Sim.dll interface only supports third party online gift cards with PCCharge at this time.Do not attempt to use online gifts cards with IPCharge or PAYware PC
The set up process is similar to credit cards. In fact, the data you enter under the gift card settings will be the exact same for credit cards. Each VeriFone product has it's own separate section for programming options for Gift Cards. Make sure you are in the correct SIMM.DLL Gift Card section when configuring your data.This section assumes you already have the RMCCWIN interface open and have access to the Gift Card Options using your Employee and strong Admin passwords.
- Under the Processing Setup tab > “Gift Card Options” > Gift Card Interface> select the “SIM.DLL Interface” option.
- Go to the SIM.DLL [Gift] Interface Options and expand the menu tree:
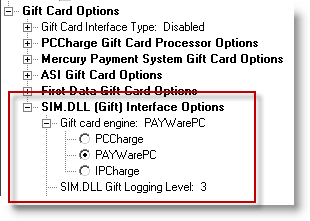
- Credit card Engine- Select one of the three options under the Gift card engine branch using the radio buttons
- SIMM.DLL Logging Level- The value entered in this field determines the amount of logging desired. If enabled SIMEvent.log file is created.
The values are:
0- Off/No Logging
1- Errors Only- records errors that occur during startup, processing transactions, or improper setup
2- Information- records general transaction information when processing payments
3- Detailed Debug- records detailed information regarding the application's progress during the transaction.
PCCharge Settings (Gift Card)
Each VeriFone product has it's own separate section for programming options for Gift Cards. Make sure you are in the correct SIMM.DLL Gift Card section when configuring your data. Use the following steps to configure options for PCCharge. Under the SIM.DLL Interface Options go to the PCCharge Via SIMM.DLL Settings menu option and fill in the following fields:
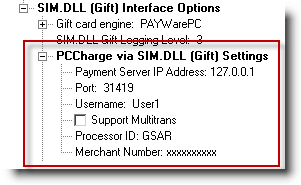
- Payment Server IP Address- This is the IP address of the computer where PCCharge is running. The default setting is 127.0.0.1 (the computers loopback IP). The setting should be changed to the IP address of the computer where RMCCWIN resides. If running RMCCWIN and PCCharge are running on different computers, change the IP address setting to the computer’s IP address where PCCharge resides.
- Port- The default value is set to 31419. Make sure the RMCCWIN setting has the same port number configured in PCCharge >Setup >Configure System >Advanced >Configure IP settings.
- Username- This field setting must be the same as the username assigned in PCCharge. The username by default is "User1". You can verify this in PCCharge under Setup > Users.
- Support Multitrans- This option will support multi-transaction mode, this keeps the line or internet link open for a few seconds after processing to wait around for another transaction. This must also be enabled in the Payment Server.
- Processor ID- Name (abbrev) must match Credit Card Company used in Payment server (i.e. Paymentech = GSAR) or this field can be left blank if "Use Default Processor" is checked in the Payment Server (Configure System > Preferences).
- Merchant #- Number must match Credit Card Company used in Payment server (i.e. Paymentech = GSAR) or this field can be left blank if "Use Default Processor" is checked in the Payment Server(Configure System > Preferences) .
PAYware PC Gift Card Settings (NOT SUPPORTED)
Each VeriFone product has it's own separate section for programming options for Gift Cards. Make sure you are in the correct SIMM.DLL Gift Card section when configuring your data. Use the following steps to configure options for PAYware PC. Under the SIM.DLL Interface Options go to the PAYware PC Via SIMM.DLL Settings menu option and fill in the following fields:
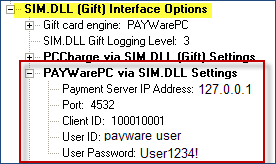
- Payment Server IP Address- This is the IP address of the computer where PAYware PC is running. The default setting is 127.0.0.1 (the computers loopback IP). The setting should be changed to the IP address of the computer where RMCCWIN resides. If running RMCCWIN and PAYware PC are running on different computers, change the IP address setting to the computer’s IP address where PCCharge resides.
- Port- The default value is set to 4532. Make sure that Management Client has the same port number configured in Configuration->View Configuration >Integration Manager->General TCP/IP Port. The Management Client is typically installed in C:\Program Files\VeriFone\PAYware PC\Server\ManagementClient.exe.
- Client ID- The default value is set to “100010001”. This value corresponds to the account setup in the management client or the configuration wizard, the first account has a client ID of 100010001, if a second client is setup under that same account the client ID will be 100010002. The ClientID value is actually made up of three different pieces of information: An ACCOUNT number, a SITE number, and a TERMINAL number.
- User ID- This field setting must be the same as the user’s login assigned in PAYware PC. The UserID setup in PAYware PC must have proper permissions to perform credit card transactions.
- User Password- Enter the same password assigned to the UserID in PAYware PC.
IPCharge Gift Card Settings (a.k.a.PAYware Connect) NOT SUPPORTED
Each VeriFone product has it's own separate section for programming options. Make sure you are in the correct SIMM.DLL gift card section when configuring your data. Use the following steps to configure gift card options for IPCharge . Under the SIM.DLL (Gift) Interface Options go to the IPCharge Via SIMM.DLL Settings menu option and fill in the following fields:
- Client ID- The ClientID used by the integrator or merchant determines which merchant account / terminal will be used to process the transaction. This value is automatically assigned by IPCharge, PAYware PC, and PAYware Transact. The ClientID value is actually made up of three different pieces of information: An ACCOUNT number, a SITE number, and a TERMINAL number. Note: for IPCharge users: this value can be retrieved on the completion for the merchant setup by a reseller in the reseller console.
- User ID-Enter the user's login as assigned by IPCharge . The UserID must have proper permissions to perform credit card transactions.
- User Password- Enter the password assigned to the UserID in IPCharge
- Merchant Key-Enter the key provided by VeriFone. This field is used to validate the merchant by IPCharge
- URL- By default this is set to https://IPCharge.net/IPCHAPI/rh.aspx. This is the URL of the IPCharge gateway.
RM BackOffice SETTINGS
There is only one setting that needs to be applied under the Station Configuration <Credit Card Authorization Setup> in the RM BackOffice Module. You will need to be logged into the RM BackOffice with an administrator password and use a strong password to have access to the Credit Card Authorization Setup. Use the following steps to complete the setup process:
- In the RM BackOffice Module, go to Setup > Station Configuration
- Select the Admin Settings button at the bottom of the Station Configuration Form , enter your strong Admin password, and hit “OK”
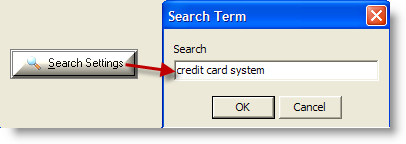
- Select the “Search Settings” button, type “credit card system”
- Select the “Master” station configuration on the Stations list.
- Click on the Credit Card System filed setting under Credit Card Authorization Setup on the menu tree and select PC Charge/PAYware PC/IP Charge option on the drop down menu

Note: the Transaction directory should be " .\ " unless otherwise instructed.
- While highlighted on the Credit Card System menu option, copy the setting to the other stations using the “Copy Setting(s)” button.